|
Software to facilitate your work |
| Home |
| Software |
| Shareware |
| Download |
| Purchase of the software |
| Community |
| Contact |
| Partners |
| Site map |


|
SOFTWARE |


|
OPCutting - Tutorial of performing of cutting metal sheets optimization |
|
This page describes, step by step, the creation of a cutting plan of metal sheets. You can print the page and in order to have assistance when making your first cutting plan of metal sheets with the sheet cutting software. |
Download and try OPCutting for free for 30 days!
|
Reminder to users who have arrived on this page from a search engine. OPCutting is a sheet cutting software for determining the arrangement of pieces on the metal sheets or wood panels, so as to reduce the number of sheets used and to limit the number of unusable offcuts. |
||||||||||||||||||||||||||||||
About this tutorial |
||||||||||||||||||||||||||||||
 |
The tutorial explains the use of OPCutting with a simple example (for sheet layout) comprising two sheets of different formats in which we must cut of four pieces also of different sizes. The cutting plan contains only one type of metal and all sheets are the same thickness. |
|||||||||||||||||||||||||||||
| < Previous | ||||||||||||||||||||||||||||||
The cutting list chosen for example |
||||||||||||||||||||||||||||||
| The video shows the panels and parts to be used in the cutting plan in an Excel workbook: | ||||||||||||||||||||||||||||||
We will cut these Pieces in panels with following formats:
|
||||||||||||||||||||||||||||||
| < Previous | ||||||||||||||||||||||||||||||
Setting for sheet cutting optimisation |
||||||||||||||||||||||||||||||
 |
You must first change some information in the options management module (see software user guide). You can change the name in which objects are made cuts. OPCutting allows you to determine whether or not to take into account the grain direction to fit the specifics of your business. |
|||||||||||||||||||||||||||||
| < Previous | ||||||||||||||||||||||||||||||
 |
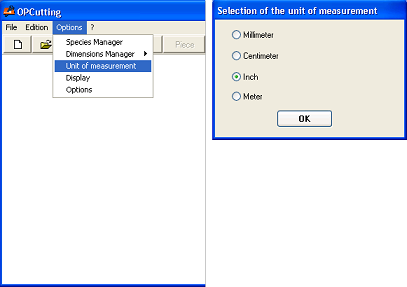
To create your complex cutting plan with the sheet cutting software, you must first verify that the unit of measurement used by OPCutting is the "Inch" (see software user guide). |
|||||||||||||||||||||||||||||
| < Previous | ||||||||||||||||||||||||||||||
Begin the creation of the cutting plan |
||||||||||||||||||||||||||||||
 |
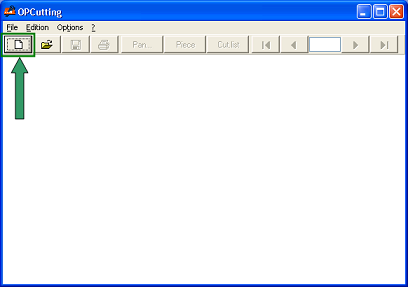
To start creating your cutting plan, just click on the button showing a blank page. |
|||||||||||||||||||||||||||||
| < Previous | ||||||||||||||||||||||||||||||
 |
Select the type of cutting plan. |
|||||||||||||||||||||||||||||
| < Previous | ||||||||||||||||||||||||||||||
Data entry of the cutting plan |
||||||||||||||||||||||||||||||

|
You must enter the formats of sheets, given in the second table in the section "The cutting list chosen for example". |
|||||||||||||||||||||||||||||
| < Previous | ||||||||||||||||||||||||||||||
 |
You must enter the sizes and quantities of pieces given in the first table in the section "The cutting list chosen for example". |
|||||||||||||||||||||||||||||
| < Previous | ||||||||||||||||||||||||||||||
 |
You must enter the values of the cutting thickness. |
|||||||||||||||||||||||||||||
| < Previous | ||||||||||||||||||||||||||||||
Result of the cutting optimization |
||||||||||||||||||||||||||||||
 |
The sheet cutting software shows the diagram obtained after the optimization calculation has done. The diagram shows sheet by sheet, the layout of pieces. This layout is optimized by the software to limit the quantity of sheets used and the number of unusable off-cuts. It's possible to print the optimized cutting plan for use in the workshop then the diagram for the realization of cuts (see software user guide). |
|||||||||||||||||||||||||||||
| < Previous | ||||||||||||||||||||||||||||||
 |
You can ask the sheet cutting software to display the drawings of pieces with these dimensions. It's possible to print the drawings of pieces of the cutting plan if it seems useful to you (see software user guide). |
|||||||||||||||||||||||||||||
| < Previous | ||||||||||||||||||||||||||||||
 |
You can ask the sheet cutting software to display the cutting list obtained after it has done the calculation. It's possible to print cutting list for use in the workshop (see software user guide). It is also possible to export this cutting list to a file for reuse in Excel or other software. |
|||||||||||||||||||||||||||||
| < Previous | ||||||||||||||||||||||||||||||
 |
You can ask the sheet cutting software to display the summary of optimized cutting plan (see software user guide). This summary can be printed if you wish. |
|||||||||||||||||||||||||||||
| < Previous | ||||||||||||||||||||||||||||||
|
|
||||||||||||||||||||||||||||||